


Monday, July 25, 2011
Saturday, July 23, 2011


Friday, July 22, 2011

Wednesday, July 20, 2011

Tuesday, July 19, 2011

Monday, July 18, 2011

Friday, July 15, 2011

Thursday, July 14, 2011


Sedona encaustics 2011


Tuesday, July 12, 2011


Summer Work in Sedona, AZ


Summer Work in Sedona, AZ


Summer work in Sedona, AZ


Saturday, June 25, 2011
Recent Encaustic

Sunday, June 19, 2011
Grilling Encaustics


Here is my encaustic set up in Sedona, AZ using a grill at a low temperature suitable for the encaustic technique. R & F pigment blocks, Lyra encaustic crayons, Da Vinci Encausticks, Caran d'Ache crayons, Crayola crayons, Lyra Aquacolor clockwise.


Thursday, June 9, 2011
New Encaustic Paintings

Tuesday, June 7, 2011
When Just a Dab Will Do.
Most artists have some dry pastels in their studio. Whenever you need a little spot of a certain color or a special glaze here is a quick solution. Use either matt acrylic medium or gloss acrylic medium and scrape with a knife blade or use a cheese grater or rub the pastel on sandpaper and collect the dust. Wear a mask of course. Mix this unique color with the medium to make an acrylic paint or glaze. Several different pastels may be combined as well. Works fine if you wish to add the dry pigments to beeswax damar mix for encaustic. Just do not mix the acrylic mix with the encaustic mix.
Monday, June 6, 2011
Natural Colors Using Ochre.
In my last post YELLOW OCHRE was listed as one of the six necessary colors.
If you add varying amounts of YELLOW OCHRE or YELLOW OXIDE to the colors I showed in the circle last time you will get colors seen in the natural world.
Starting with the YELLOW MEDIUM on the left add some YELLOW OCHRE on the right to get the color in the middle.
Continuing:
Do the same to YELLOW GREEN, GREEN, BLUE GREEN, ULTRAMARINE BLUE, BLUE, BLUE VIOLET, VIOLET, RED VIOLET, RED, RED ORANGE, ORANGE and BLACK.
By varying the amounts you will get numerous colors. By adding WHITE, and / or BLACK to the mix the tints and shades will be very useful in painting from nature.

Saturday, June 4, 2011
All You Really Need. Colorwise.
Paint manufacturers offer an endless number of colors to tempt us but what they do not tell us is that we only need six colors plus black and white to mix everything they offer.
YELLOW MEDIUM
PHTHALO GREEN (blue cast)
PHTHALO BLUE (green cast)
THIO VIOLET or QUINACRADONE MAGENTA (ACRA)
RED LIGHT (Scarlet) (Cadmium Red Light) or (Napthol Red Light)
***THIS IS NOT LIGHT RED WHICH IS A BRICK COLOR***
YELLOW OCHRE or YELLOW OXIDE
WHITE
BLACK

With these six colors you can mix a complete color wheel with saturated pure colors.
Mix YELLOW LIGHT by adding WHITE to YELLOW MEDIUM.
The color circle is easy:
Y-YYG-YGG-G-BGG-BBG-B-BBV-BVV-V-RVV-RRV-R-RRO-ROO-O-OOY-OYY
Add YELLOW OCHRE to any of these to alter saturation.
Add WHITE and / or BLACK to any for browns and natural greens or to make tints and shades.
Master color and do not let paint companies master you.
Friday, June 3, 2011
Don't Throw Away Your Seafood Forks!
Seafood forks make great encaustic tools. I got a set of them at the supermarket. The spatula end is good for applying hot wax and smoothing it out whilst the forked end is good for texture.
http://www.legendcookshop.co.uk/seafood-forks-8695-0.html
http://www.legendcookshop.co.uk/seafood-forks-8695-0.html
Tuesday, May 31, 2011
Tjanting Anyone?
The traditional Tjanting tool for Batik would be a delight to use to make flowing lines in hot wax.
Here is how I made mine. I found an old brass metal ballpoint pen. I cut off @ an inch with a hacksaw.
With a metal file I removed enough metal at the small round tip to make a 5/64 " hole.

Drill another hole 5/32 " @ 1/4 inch from the opening.

Cut off the head of a 5/32" screw leaving @ an inch.
Thread this 5/32" rod just into the side opening on the metal cone.
Cut the metal ball point pen cartridge so that it is @ 1 1/2". Insert this into the well of the cone.
Now, add the threaded rod to the wood burning tool with heat regulator mentioned in my earlier blogs.
Put some heated wax with a brush into the well of the cone and turn the heat on the iron until it is warm enough to keep the wax flowing.
To use, just push down until the tip of the ball point is pushed up from the hole in the cone and wax will flow until you raise the cone and the ball point tip falls back down to block the hole.
Here are some options for the cone:
 Small metal cone pocket for flowers.
 Brass cones for jewelry making.

Metal cake decorating cone tips.
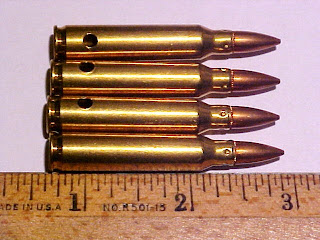
Brass bullet shell casings:
Any of these can be adapted to make your own Tjanting.
Here is how I made mine. I found an old brass metal ballpoint pen. I cut off @ an inch with a hacksaw.
With a metal file I removed enough metal at the small round tip to make a 5/64 " hole.

Drill another hole 5/32 " @ 1/4 inch from the opening.

Cut off the head of a 5/32" screw leaving @ an inch.
Thread this 5/32" rod just into the side opening on the metal cone.
Cut the metal ball point pen cartridge so that it is @ 1 1/2". Insert this into the well of the cone.
Now, add the threaded rod to the wood burning tool with heat regulator mentioned in my earlier blogs.
Put some heated wax with a brush into the well of the cone and turn the heat on the iron until it is warm enough to keep the wax flowing.
To use, just push down until the tip of the ball point is pushed up from the hole in the cone and wax will flow until you raise the cone and the ball point tip falls back down to block the hole.
Here are some options for the cone:
Metal cake decorating cone tips.

Brass bullet shell casings:
Any of these can be adapted to make your own Tjanting.
Subscribe to:
Posts (Atom)